Category Archives: tutorial

How to Make Earrings out of Bangles – OR – Serendipity Rules !

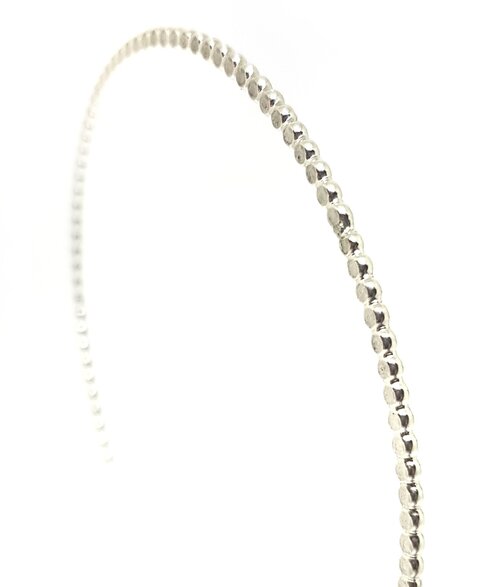
I’ve been meaning to make a beaded wire bangle for ages – you know that lovely silver wire that looks like lots of silver beads – I finally had chance and I though it looked great.

Making-earrings-out-of-bangles

BUT…It felt a little flimsy.

In my rush to get creative I had ordered 2mm beaded wire – 2mm round is fine for bangles – but of course 2mm beaded wire is thinner between the beads.

I tumbled the bangle for 2 days, hammered like mad with a nylon mallet and still it wasn’t hard enough, i even tried hammering with a metal hammer, the bangle looked even better but still too soft.

I am just a little obsessive and can’t let go but finally I had an idea that I thought would work…..

Serendipity – Lucky Mistake !
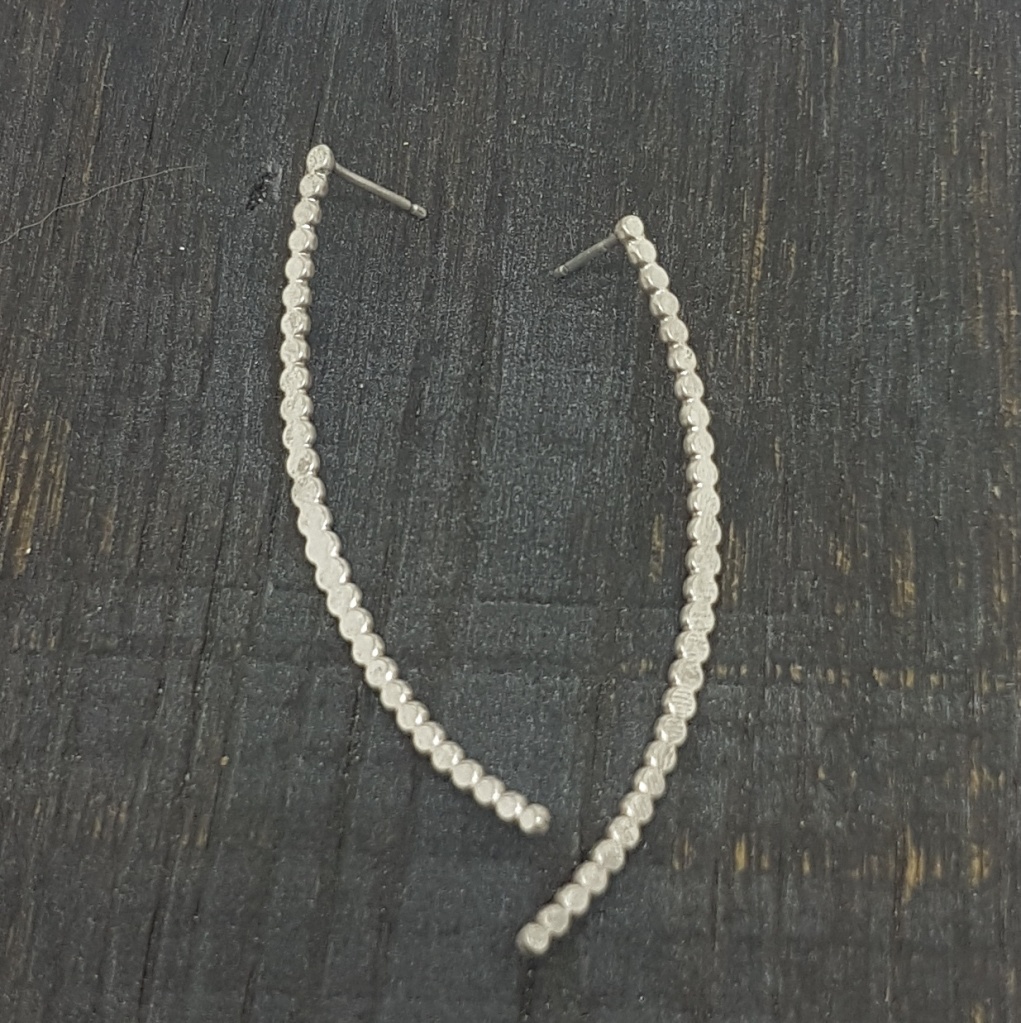
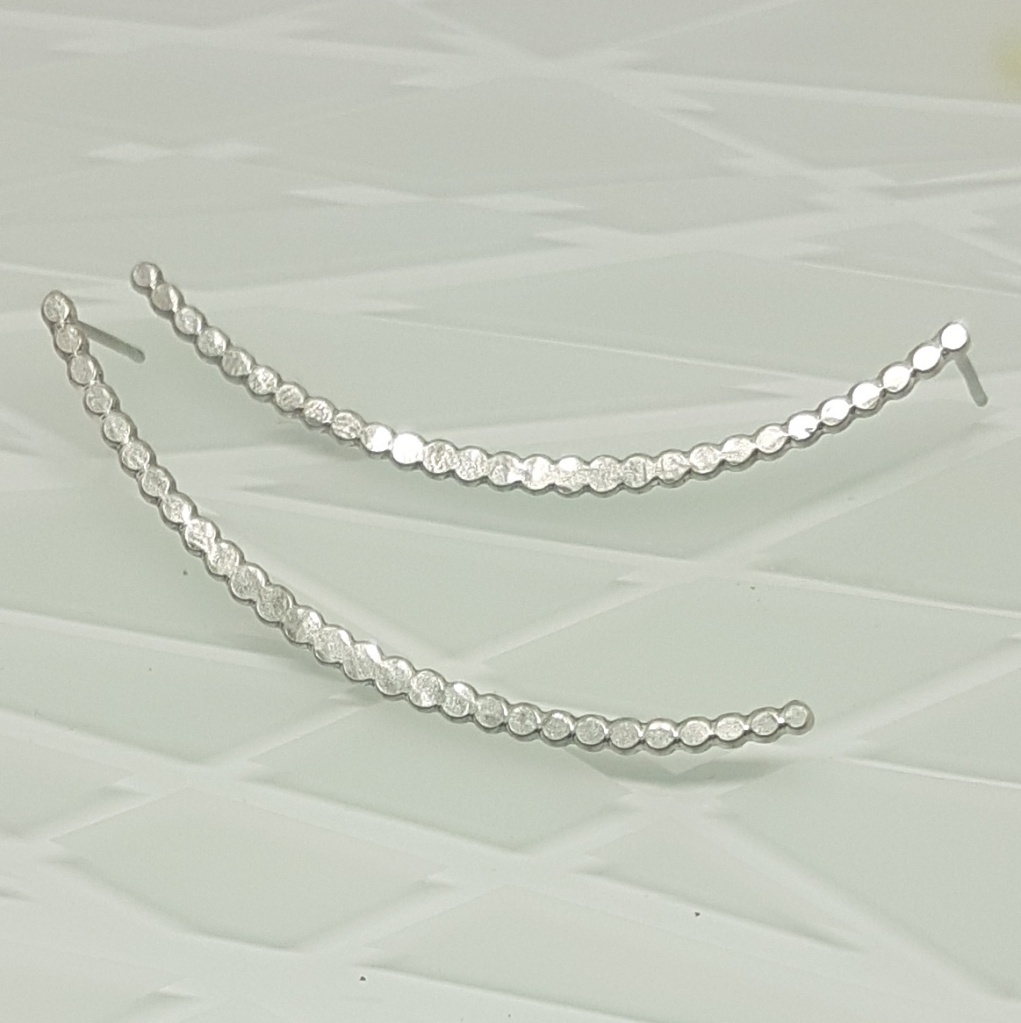
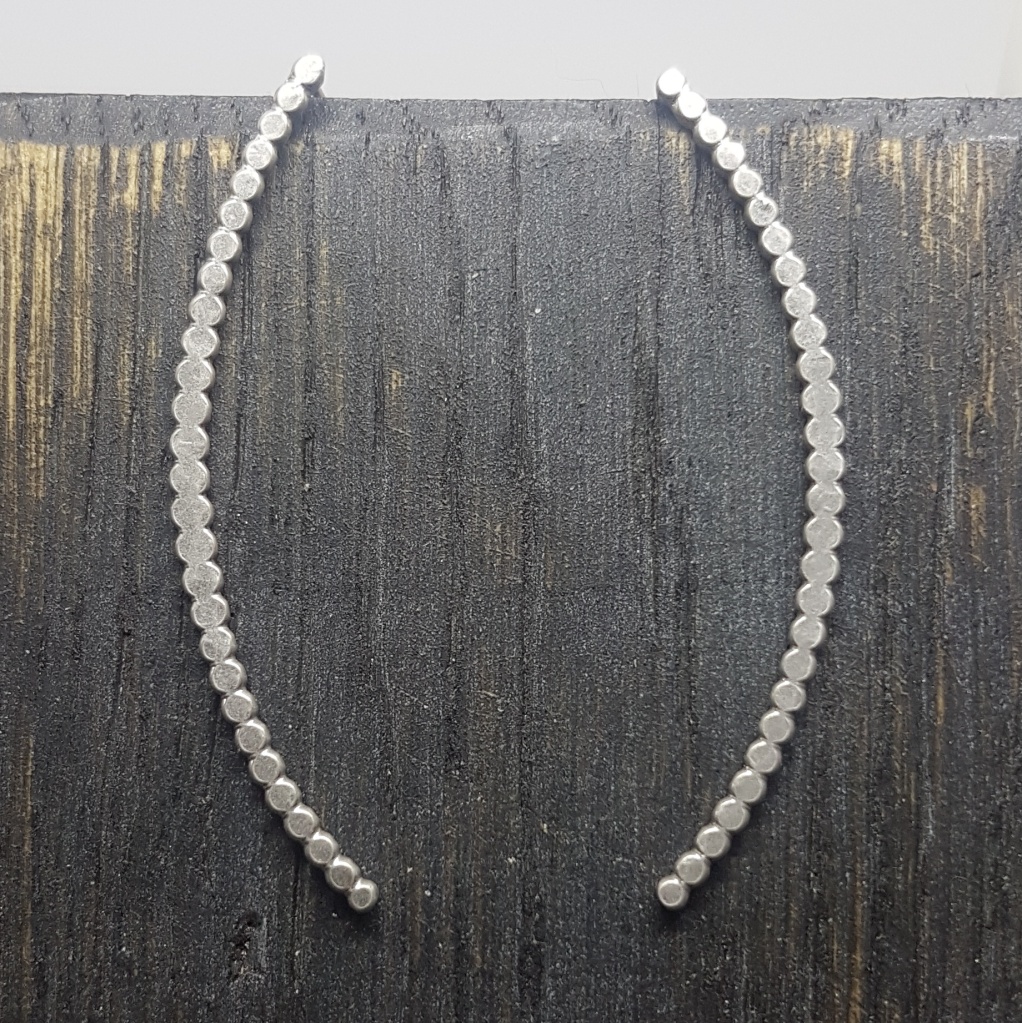
So here they are, 2 pairs of Serendipity Earrings, one pair all shiny and even, the other matt and more hammered/bigger balls in the middle – They are for sale (just cick on the images) but be quick, I might get the next bangle right 🙂

How – I cut the bangle into 4, evened up the lengths so I had 2 pairs, sanded the ends smooth and hammered one pair in the middle so the bubbles are larger then get smaller. All I had to do then was solder the stud pin on the back and check that the silver was still hard and hadn’t annealed. Voila (as they say constantly here) fabulous, long studs – they do look great on.

Coming to my website soon – Serendipity Bangle – A thicker version that will work !

A Setting A Day – Day 5 – Fab Sea Glass Rings !

I wanted to find an easy way for students to make rings with sea glass or other found objects and I came up with these.

Sea Glass Ring - TutorialTutorial how to make sea glass ring

They are great fun to make and are similar to the Turquoise Ring on Day 1 but easier to get a nice tight setting.

Step by Step – Green Ring

Seaglass ring tutorial

1 – Start off with a soldered silver ring, smallish piece of sea glass  and two pieces of 0.8mm silver wire.
2 – Ball the ends of the wires.
3 – Put the ring on a ring stick and hammer a small section to flatten it a little
4 – File a notch in the flattened section that will take both wires side by side

SGR2

5 – Bend the wires so they made a cross shape and solder them to the ring (don’t worry if it looks a bit like a weird insect at this stage ;-).

SGR3

6 – Pickle and polish the ring

step by Step ring sea glass

7 – Wrap the wires around the glass then twist !

made a sea glass ring

I used pliers to “twink” the wires and tighten the setting.

sea glass silver ring

Jewellery Making Workshops – If you like this ring come and make one – It’s just one of the projects you can choose on our Introduction to Silversmithing and Stone Setting workshops.

A Setting A Day – This week I posted a different setting technique each day –

Day 1 A Setting A Day – Day 1 – Cute Prong Set Turquoise Ring
Day 2 A Setting A Day – Day 2 – Bezel Set Ring
Day 3 A Setting A Day – Day 3 – Sweet & Simple – Pearls on Wires – Step by Step
Day 4 – A Setting A Day – Day 4 – Fabulous Tube Setting

A Setting A Day – Day 3 – Sweet & Simple – Pearls on Wires – Step by Step

Todays setting isn’t really a setting  but an easy way of making a pair of pearl earrings.

handmade artisan sterling silver pearl earrings long wiggly

These earrings are made with a single piece of wire and just slip through your ears so the wire used is 0.8mm thick – too thick for most pearls.  This limitation has driven me mad for ages as I love this simple way of making earrings.   I have a pearl reamer but don’t really enjoy using it then I came across this simple tip on Barbara Fernalds blog – Use a jewellery saw and slip onto the saw blade the pearls you want to use then simply run the pearl up and down the blade turning them (or the blade) as you go – FAB !  You can read more about this by clicking here and visiting Barbara’s blog handmade pearl and silver earrings contemporary

Step By Step – How to make these earrings
1 – Enlarge the holes in your pearls until they fit on 0.8mm wire
2 – Cut about 8cm x 2 of 0.8mm sterling silver wire
3 – Hold the wires together and use chain nose or flat pliers to make zig zags in the last 3cm of the wires (doing this with the wires together means that the zig zags will be similar
4 – Hammer the zigzags and rub down the ends
5 – If you have a tumbler tumble the wires now
6 – Slip a pearl on each wire down to the zigzags
7 – Leave about 2cm above the zigzag straight then curve the rest around a mug, use your chain nose or flat pliers to bend the wires at the start of the curve
8 – Cut the ends of the wires so they are the same length and rub down.  Tweak the earrings until you are happy with them
9 – Slip them in and rush out and show your friends !

This is just one of the available projects you can choose to learn how to make on our jewellery making holidays – Come and make something beautiful ! 

Old Film + Copper Washers = Earrings ! Day 29 – Step by Step Earrings

Riveting, aren’t they 😉

Film8These earrings started off a couple of years ago when I went to a local vide grenier (literally translates as empty attic) a bit like a car boot sale without the cars.  Some vides are all broken Barbie dolls and action figures others very antiquey.  This one was in Estaing and included the little school selling off lots of very old school equipment.

step by step riveted earrings

Including this old film – Histoire de la Marine Francaise in the cutest box.  I had some copper washers…

...which I put through my rolling mill along with leaf skeletons for texture (the colour of the copper is due to annealing them with the torch before rolling).

…which I put through my rolling mill along with leaf skeletons for texture (the colour of the copper is due to annealing them with the torch before rolling).

I drilled holes for the rivets (the double holes on the top one were a mistake caused by rushing that I had to get over later)

I drilled holes for the rivets (the double holes on the top one were a mistake caused by rushing that I had to get over later)

copper riveting earrings

Washers ready to be riveted with handmade silver rivets – the film is trapped between the washers.

Riveting copper washers

Riveted ! The film was then cut around the edge using scalpel.

After messing up the top hole on one of the earrings I had the idea of riveting a bail to the top of the earrings to hide my mistake (always have a plan b ;-)

After messing up the top hole on one of the earrings I had the idea of riveting a bail to the top of the earrings to hide my mistake (always have a plan b 😉

The bail has a balled end ear wire threaded through it.

The bail has a balled end ear wire threaded through it.

step by step riveted earrings

The ear wires were then bent and hammered. My film was of ships but on their sides looked more like designs.

You could use negatives of past memories or colour slides – I’m itching to try this again with pieces of vintage tin boxes.  I don’t know how well the film will react to sunlight and you would of course have to be careful with them but aren’t they cute ?

Riveting is a brilliant technique to learn and can be used in lots of ways within jewellery – joining pieces together than maybe can’t be soldered, using them for decoration and texture, making bails for pendants or glass – Have a look at our riveting workshop and FaceBook page for more examples.

Days 21 to 25, Step by Step Etched Earrings & Twisted Vines

Well it turns out that sometimes I just can’t fit in running a workshop, packing orders, making orders and taking Choo Choo for his walks and updating my blog, especially when our lovely students take us out to dinner 😉

So here are a couple of things that I made in  the lost days.

Etched Cosmos Earrings – Copper & Silver

I polished the copper by hand to keep the lovely soft colour and tumbled the chains and ear wires - The chains hang behind the copper and add lots of movement - One of a Kind Earrings - £24

The chains hang behind the copper and add lots of movement – One of a Kind Earrings – £24 – Click on the photo to buy

Step by Step

etched copper earrings - step by step

Applying the Resist (the parts that don’t get etched) This is a sheet of stickers for card making.

etched copper earrings tutorial

Using tweezers I applied some of the circles to my piece of copper and packing tape on the back so it doesn’t get etched.

salt water etching - earrings

Copper after etching using the salt water etching method

etched earrings step by step

I cut the copper into two pieces and curved them

Handmade components - Tiny handmade silver spiral charms added to pieces of silver chain * balled ear wires ready for pickling

Handmade components – Tiny handmade silver spiral charms added to pieces of silver chain * balled ear wires ready for pickling

I polished the copper by hand to keep the lovely soft colour and tumbled the chains and ear wires - The chains hang behind the copper and add lots of movement - One of a Kind Earrings - £24

I polished the copper by hand to keep the lovely soft colour and tumbled the chains and ear wires 

If you fancy a go at etching email me about our jewellery making workshops !

Here are another pair of earrings I made last week – Twisted Pearl Vines

Twisted vine silver and pearl handmade earrings
twisted vine earrings handmade in silver and pearl
Tiny leaves cut from silver sheet and textured with real leaf skeletons with stud backs and long twisted wire makes a vine holding a small black/peacock freshwater pearl – long, extremely elegant and the pearl add a flicker of movement.  Very Cute ! – £25 – You can click on the photo to buy these.

Students Work
On Friday we were very sad to say goodbye to Fran & Sue, we’d had a great week of jewellery making and I’ll be posting the photos of their creations this afternoon on FaceBook and on an extra blog posting here so follow my blog for automatic updates.


Oak Leaf Brooch – Step by Step – Day 13

Yesterday I used one of the oak leaves (see yesterdays blog) I found on my walk to texture this brooch

handmade copper oak leaf brooch

Copper & Silver brooch – 3.5 x 2cm – One of a Kind – £17  Oxidized to give it a softer glow and to bring out the detail of the leaf.

And here’s the step by step process of me making it.

step by step how to make a riveted brooch

I used my rolling mill to transfer the texture of one of the oak leaves onto a piece of copper – the other is textured with masking tape

I made the brooch using 2 pieces of copper because I wanted to stamp the back without spoiling the leaf texture on the front.

Brooch findings ready to be soldered onto the back of the brooch

Brooch findings ready to be soldered onto the back of the brooch

step by step how to make a riveted oak leaf brooch

Fine silver rivets – I taped the two pieces of copper together to keep them in place while I drilled the holes for the rivets

Tutorial = riveted brooch

Ready to be riveted

how to make a brooch - workshops in france

Riveted front

and back

and back

From little acorns brooch

The finished back complete with tiny letter – ” from little acorns…. ”  This is after pickling (without the stainless steel pin – I’ve done that before) and polishing and oxidizing.

Come and learn how to rivet and use a rolling mill for texture on one of our jewellery making workshops – whether you are a complete beginner or want to expand on your existing skills our very small classes ensure almost one to one tuition.

October Make & Show Challenge – This month I have set myself the challenge to make something and post about it everyday – follow my blog for automatic updates.  Some of the jewellery featured is available for sale here  – http://www.lavidalerie.com/BlogJewellery.html